Address:
327 Tebbs Bend Road
Campbellsville Kentucky 42718
Phone: 270-789-3025 or 270-465-8726
327 Tebbs Bend Road
Campbellsville Kentucky 42718
Phone: 270-789-3025 or 270-465-8726

The Battle of Tebbs Bend is one of five major engagements associated with Confederate Gen. John Hunt Morgan’s Great Raid in the summer of 1863. Two of those engagements were in Kentucky, Tebbs Bend on July 4 and Lebanon July 5, 1863. There was one battle in Indiana at Corydon on July 9 and two in Ohio at Buffington Island and Salineville on July 19 and 26, respectively. Tebbs Bend and Buffington Island were by far the fiercest engagements.
 On June 20, he crossed the Cumberland River. Morgan’s objective was Louisville and its warehouses full of supplies awaiting shipment on the L&N Railroad but, if fortune shone on him, Morgan also planned to cross the Ohio River into Indiana and Ohio. He already had scouts in both states, looking for the best places to ford the river. Morgan was prepared to attack Carthage, Tennessee, on June 21 when he was ordered to intercept a Federal force threatening Knoxville.1
Union command was well aware of Morgan’s actions. When Morgan crossed the Cumberland, Gen. William Rosecrans informed Gen. Ambrose Burnside of the Confederate strength and location and Burnside sent word to his commanders in Kentucky to prepare for Morgan. Gen. Henry Judah and the 3rd Division, 23rd Army Corps, was headquartered in Glasgow, Kentucky, guarding the approach to Kentucky. Judah moved southeast toward Tompkinsville and called his second brigade from Columbia to Marrowbone to guard his left flank. There was now nothing to prevent Morgan from moving from Burkesville to Columbia to Campbellsville to Lebanon. In ordering Gen. Edward H. Hobson to move from Columbia to Marrowbone, Judah opened the way for Morgan’s ride north.2
On the evening of June 30, Morgan’s forces began to cross the flooded Cumberland River at Burkesville, Kentucky, about thirty-five miles upriver from Tompkinsville. The swollen river was between one-quarter and one-half mile wide and only a portion of the Confederates were able to complete the crossing. Various fords in the area were used. The crossings by ferry and ford continued into July 2. The Confederates met almost no resistance. The fords were posted with only light pickets because General Henry Judah believed the river was too high to cross.3
On the afternoon of July 2, Morgan sent scouts to determine the Federals strength. Judah had orders to attack with cavalry when Morgan crossed the river. Hearing an exchange of fire, Morgan led a force to the Norris Branch area of the Marrowbone Glasgow Road, where they surprised a 300-man Union cavalry column. The Union forces retreated, followed by Morgan’s men, who soon found themselves facing a regiment of Federal infantry formed in line of battle further up the road. The Confederates stopped short and were met with a volley of fire. The Federals skirmished with Morgan for about an hour and then the Confederates retreated. The skirmish accomplished little of military significance except that Capt. Tom Quirk, Morgan’s chief scout and his “eyes and ears,” was wounded and had to be taken back to Tennessee.4
Morgan, like most cavalry commanders, divided his command and sent them north along various routes, both to avoid crowding along the main roads and to disguise his numbers from Federal authorities.5 After a brief and deadly skirmish in Columbia with a detachment of Col. Frank Wolford’s 1st Kentucky Cavalry who retreated to Jamestown, late in the afternoon of July 3, 1863 Morgan’s command began to file out of the town. The Rebel soldiers traveled along the Campbellsville Pike heading north. Some camped between the village of Cane Valley and Ebenezer Road that night, where the Confederate cavalry foraged for food for themselves and their mounts. Other Rebel regiments turned down Ebenezer Road and started crossing Green River using the Johnson, Bailey, and Roachville fords, bypassing the Federal position.
Knowing that the Confederates were headed their way, the people hid their horses, money, and other valuables. Morgan made his headquarters at the John F. Bridgewater House in Cane Valley. There he took his dinner and breakfast the next morning. Between meals, Morgan ordered Capt. Tom Franks north toward Campbellsville to assess the strength of the Union forces at Green River Bridge. Morgan did not believe that the Federal force in Taylor County posed much threat to his command.6
In the 19th century the roads between Burkesville and Campbellsville were not nearly as direct as they are today. They, like most roads in Kentucky, tended to follow the contours, often following stream beds and crossing major and minor streams by way of fords or ferries. There were few bridges, which made the bridge across the Green River in Tebbs/Tibbs Bend extremely important strategically. The rail line ended at Lebanon, twenty miles north of Campbellsville. Supplies for southeast Kentucky and northeast Tennessee were carried over this road and bridge. The road was macadamized, good from Lebanon to Campbellsville to Columbia. The mail stage route ran over this road. It also connected the large Federal military camps at Lebanon and Columbia.
Union Preparations
The Union army had been guarding the bridge across Green River since 1862 and had constructed a stockade on the heights overlooking the bridge. The families in the Tebbs Bend area were used to having the soldiers around and encamped at various places in and around the bend. Both the bridge and the stockade were burned by Morgan on New Year’s Day 1863, near the end of his Christmas Raid. Both structures had since been rebuilt, though the bridge had been damaged again by a flood on June 28, 1863. 7
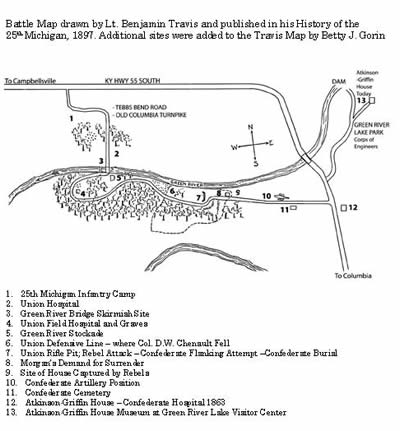
The Federal soldiers who would normally have been in the area were scattered all over south-central Kentucky looking for Morgan. Even before the fighting in Columbia, work was underway at Green River Bridge to prepare for Morgan’s advance into the area. Union Col. Orlando Moore was in command of 260 men of the 25th Michigan who were charged with guarding the bridge across the Green River. On June 29, Moore began his defensive preparations. As part of that preparation, Moore increased patrols or pickets in Tebbs Bend and the surrounding area. West of Moore’s main defensive position, at the extreme end of Tebbs Bend, were two fords, both of which led directly to the Howard House. From the Howard property a road led directly to the Columbia Turnpike, which could be used by Confederate cavalry to get behind the Federal defenses. Moore posted guards at the fords.8
 Col. Moore spent the next few days preparing for an attack that he believed was inevitable. He abandoned both the stockade and his encampment north of the Green River after he determined that they could not be defended with the force he had at his disposal.
He chose to erect a temporary fortified position on a narrow neck of land east of the bridge, on a knoll in the Tebbs Bend of the Green River. The only access to the bend was through the Narrows, an opening only 100 yards wide flanked on both sides by the river. This land gave a decided advantage to the defenders. Here the land “. . . drops precipitously on the north side of the ridge 150 feet into the river.” Confederate Col. Basil Duke, Morgan’s brother-in-law and right-hand man, later described it as “one of the strongest natural positions I ever saw.”9
Moore had no artillery and he knew Morgan had several pieces. He detailed seventy-five men to construct a temporary forward line. A rifle pit was dug about 100 yards in front of the main position along with a number of supplementary trenches that provided an avenue for the quick withdrawal of Moore’s men to the main defended position. Another detail felled trees to provide timber for the main defense line. They worked until almost midnight and then slept where they worked. The next morning, July 2, a relief work detail arrived to fell trees to clear a field of fire. They set logs on end in a trench and put dirt in front of them, forming a breast works. Felled trees with sharpened branches, abatis, pointed toward the enemy’s line of approach. When Morgan’s force reached within one mile of the south bank of the river on July 3 they could hear Moore’s men felling trees to complete the fortification. Work continued into the night as men placed sharpened spikes in two zigzag rows in front of the abatis. The hurriedly constructed parapet was finished the morning of July 4. It was admirably sited, protected by thick woods on three sides and steep banks on two sides. It was impossible for artillery to shell the fortification. This defensive preparation forced the Confederates to attack in a narrow front that did not allow them to maneuver or use their superior numbers to their advantage.10
Gen. John Hunt Morgan, who commanded a large, well trained, experienced force, expected little trouble from Moore’s smaller force of untried troops. The report of his scout, Capt. Franks, led Morgan to believe that Col. Orlando Moore would put up little resistance. It was the first time Franks had led a reconnaissance mission; his report to Morgan was in error. Col. Moore was well prepared and ready to fight.11
Morgan Moves
Morgan decided to send three regiments in a direct attack against the Union position, holding two regiments in reserve. Two more regiments commanded by Col. Roy S. Cluke and Lt. Col Wash Owen would carry out a flanking maneuver north of the bridge, cutting Moore’s communications, preventing reinforcements from Lebanon, and blocking the retreat of the defeated Union troops. The night of July 3, Morgan’s scouts set out, followed shortly by the main body of troops. They were guided by men who had grown up in the area and were well acquainted with the location of the Green River’s many fords. Cluke and Owen crossed the Green River south of the Union position at three fords in the Lemons Bend area. This circuitous route took them west of the Union position. They rode around Tebbs Bend, where a portion of the force forded the river. When they arrived at the bottomland on the north side of the bridge they did not find the Union camp they expected. 12
Moore had begun to move the camp some hours earlier, when he received reports that the Confederate force was only two miles away. Working by the light of the full moon, the Federal troops slowly and quietly began to move the wagons toward the temporary bridge built to replace the partially finished bridge destroyed by high water less than a week before. When they reached the end of the bridge at least one company of foot soldiers and a number of mounted men turned and walked back over the bridge, repeating the maneuver a number of times, hoping to give the impression that reinforcements had arrived.13
It took all night to move the men, horses, wagons, and supplies across the Green River. Moving the sick and wounded in the hospital was especially difficult and time consuming but finally all but a few men detailed to stay in the old camp site were across the river. Moore formed up his untried troops and told them, “Don’t be afraid, my boys. Be quiet, men. Let your guns speak for themselves. No shouting. No colors are to fly so the enemy will not know our numbers. . . We can take on thousands.” Moore’s final preparation included getting the local citizenry out of harm’s way. The Michigan troops rode to the houses located within what they feared would be the battlefield and urged the inhabitants to flee.14
At daybreak on July 4, Morgan and his staff mounted up and left Cane Valley. Although his scouts reported that Moore was preparing a defensive position and some of his officers recommended that they bypass and avoid Tebbs Bend, Morgan still expected an easy victory. At about 6:30 the morning of July 4, the Confederates deployed their artillery and began shelling the Union position. After several shots, Morgan sent Moore a demand for surrender. It was Independence Day and Moore answered Morgan’s demand saying, “Present my compliments to General Morgan, and say to him that, this being the fourth day of July, I cannot entertain his proposition.” Moore had no artillery and his force numbered only about 260 men; with only about 170 on the field. The remainder was deployed at the fords and at the bridge; some were serving as teamsters and hospital stewards. Morgan’s cavalry and artillery totaled 800 to 1,000, not including the two regiments held in reserve. Moore was outnumbered 4 or 5 to 1. When Col. Robert Alston, who delivered Morgan’s demand for surrender, pointed out the Confederate advantage, Moore replied, “I have a duty to perform to my country, and the presence of this day supports me in my decision; therefore I cannot reconsider my reply to General Morgan.”15
His demand for surrender rejected, Morgan ordered the artillerists to resume their bombardment. Moore ordered his sharpshooters, “Now boys, rise up and take deliberate aim. Shoot those Rebel gunners.” The Union sharpshooters, skilled in hunting game as small as a squirrel, decimated the Confederate gunners. The effect of their small arms fire was so great that it forced Morgan to withdraw his artillery. This left Morgan with two choices, to cut his losses and withdraw or to attack the Union position. Had John Hunt Morgan been another man he might have taken the prudent course of action and withdrawn without attacking the formidable position. He did not; Morgan ordered his division forward. They would be meeting the men of the 25th Michigan who had just been issued new Enfield rifles. 16
The Battle
Finally, Morgan and his staff were in a position to clearly see Moore’s defenses and it was certain that the Union position was extremely strong. An assault on the Federal works required a charge over an open field, a fight through the abatis, and crossing a ditch filled with water. The terrain afforded little cover. The advancing Confederates would be exposed to direct fire. Col. Adam R. Johnson had advised Morgan not to fight at Tebbs Bend earlier that day. He now asked Morgan not to make a frontal assault. Once again, Morgan declined to take his advice; he ordered the charge.
The dismounted Confederate cavalry advanced on the double-quick. Moore ordered his men to hold their fire until they had taken careful aim. As the first wave of Confederates neared the Union position they became mired in the abatis. Morgan sent more men forward in support. Moore’s regiment, though untested, was very well drilled. His men efficiently fired, reloaded, and fired again. They were all skilled hunters used to making every shot count. They did so now with devastating effect. The Confederates soon realized, some too late, that kneeling to fire or standing to reload their weapons made them attractive targets. Some lay on the ground to reload before running forward again.
But some Confederates made it to within several feet of the Union position, shooting at each other from either side of the abatis. According to Moore, “The conflict was fierce and bloody. At times the enemy occupied one side of the fallen timber, while my men held the other, in almost a hand-to-hand fight.” The Confederates were never able to use their much superior numbers effectively against the entrenched Federals. One cavalryman later reported that he had not so much as seen a Union soldier, only the ends of their rifles protruding from the port holes of the fortification. 18
Time and again the Confederates fell back, regrouped and charged again. Col. Tucker was ordered to set the Union fortifications on fire but could not ignite the green wood. In spite of the heavy losses, Morgan wasn’t finished. He ordered Col. David Waller Chenault to carry out a flanking maneuver, getting his regiment into a position where enfilading fire could be poured into the Union fortifications on the Union right flank. To do so, Chenault had to lead his men into the ravine, along the river bank, and up the steep slope to the Union fortification. Chenault in the lead, his men charged the abatis, forcing the Federals back. Hoping to create the illusions that reinforcements were arriving, Moore blew his bugle, calling up a company that had been held in reserve and signaling part of the detachment guarding the bridge to come forward. The reserve troops arrived and the Federal troops rallied, pouring pistol shot into the Confederate line. Col. Chenault was hit, falling dead at the feet of his second in command, Maj. James B. McCreary. Seeing their leader fall, the shocked Confederates pulled back momentarily. McCreary assumed command as Lt. Colonel, designating Capt. Alex Tribble his second in command. Moments later, Tribble lay dead. Seeing that something was wrong, Maj. Thomas Y. Brent raced across the field. He, too was killed.19
As the Confederates faltered Moore signaled his force to advance. He quickly reconsidered, however, and decided that it was best to remain behind his fortifications. Victory was his, in any case. Morgan, meanwhile, was being told that the Federals could not be dislodged.
At mid morning, Cluke’s regiment, which had been sent down Ebenezer Road and across Lemons Bend to be in position to gather up the fleeing Union soldiers, arrived at the former Union camp near the Green River Bridge. It was a little before ten o’clock when Col. Cluke, hearing no further fire from the battlefield advanced his force. As he neared the Green River Bridge, Cluke expected to intercept Union troops retreating in the face of General Morgan’s victory. Instead, Union sharpshooters opened fire, unseating two or three of his cavalry. Realizing that his assumption of Confederate victory was in error, Cluke withdrew under fire and rejoined the Confederate forces bypassing the position.20
At 10:30 A.M. Morgan sent a flag of truce forward that read, “I have sent under Flag of Truce Dr. J. F. Keiser, the Rev. Mr. Moore, Chaplain of the 5th Ky. Regiment, other attendants to recover the bodies our dead and wounded who are left on the field. It was signed D. Keller, Surgeon, 1st Brigade, Ky. Cavalry, C.S.A., 10 ½ o’clock.21
Moore’s men laid the bodies of the dead out along the road. Four Kentuckians, including Col. Chenault, were taken home for burial. The rest were left to be buried by others. It was not until Col. Moore was sure that the Confederates had withdrawn and that rumors of further Confederate attacks were proved false that he was willing to send out a burial detail.22
It was a short battle, lasting just four hours from the first artillery shot to Morgan’s message of truce, but it was a very costly battle for John Hunt Morgan. He lost 36 killed and 45 wounded. (Basil Duke’s numbers). He lost twenty or more experienced officers including Colonel David Waller Chenault and Major Thomas Y. Brent. 30-32 Confederates were captured. Col. Moore’s losses were much lighter; 6 men killed, 24 wounded and 1 captured.23
Significance of the Battle
James A. Ramage called the Battle of Tebbs Bend, “one of the most outstanding victories in the Civil War” because it was unusual for such a small Union force to resist Morgan and to fight so determinedly and effectively. Less than 200 untried Union recruits stood against the assaults of Morgan’s experienced force of 800 to 1,000. Morgan persisted in his determination to fight the battle against the advice of his senior officers. His decision to continue the fight after his artillery had been rendered ineffective has been called one of the very few mistakes made by General John Hunt Morgan in his entire career.
Col. Orlando Moore and his men were universally praised and commended for their bravery and their victory over Morgan. A reporter from the Louisville Times wrote that “the Battle of Tebbs Bend was evidently one of the finest planned and best fought battles of the war.” Maj. Gen. George L. Hartsuff and Gen. Ambrose E. Burnside wrote commendations. After hearing Col. George T. Wood describe the battle and his opinion that Moore and his men had “saved the city of Louisville from sack and pillage by the rebel hordes” the Kentucky House of Representatives acknowledged Col. Moore and his command in two complimentary joint resolutions.24
Morgan, could have avoided this battle altogether, and may well have wished he had. It set the tone for what became a disastrous military misadventure. Morgan was bloodied the next day at Lebanon and suffered a personal loss, that of his brother Tom. He would eventually cross the Ohio River, a stunning feat, and fight numerous skirmishes and three more major battles before he was captured about forty miles west of Pittsburgh, near West Point, Ohio.
1. James A. Ramage, Rebel Raider: The Life of General John Hunt Morgan, The University Press of Kentucky, Lexington, Kentucky, 1986, p. 160; Betty J. Gorin, “Morgan Is Coming!”: Confederate Raiders in the Heartland of Kentucky, Harmony House Publishers, Louisville, Kentucky, 2006, p. 107 and Edison H. Thomas, John Hunt Morgan and His Raiders, The University Press of Kentucky, Lexington, Kentucky, 1985, pp. 76-77.
4. Ramage, Rebel Raider, pp. 162-163; Gorin, “Morgan Is Coming!” pp. 115- 117 and Thomas, John Hunt Morgan and His Raiders, p. 77.
7. Gorin, “Morgan is Coming!” pp. 27, 86-88 and 160; James A. Ramage, Rebel Raider: The Life of General John Hunt Morgan, University Press of Kentucky, Lexington, Kentucky, 1986, p. 163.
8. Gorin, “Morgan is Coming!” pp. 158-159 and Lt. Michael A. Hogan, Map of Tebb’s Bend, July 4, 1863, National Archives.
9. Gorin, “Morgan is Coming!” pp. 159-161 and Basil W. Duke, “A Romance of Morgan’s Rough Riders: The Raid, The Capture and the Escape,” in The Great Indiana-Ohio Raid, edited by Don D. John, The Book Nook Press, Louisville, Kentucky, n.d., p. 12.
16. Gorin, “Morgan is Coming!” pp. 173, 182-183; Ramage, Rebel Raider, p. 163 and Dee Alexander Brown, The Bold Cavaliers: Morgan’s 2nd Kentucky Cavalry Raiders, J. B. Lippincott, New York, 1959, p. 180.
18. Gorin, “Morgan is Coming!” pp. 184-186 and United States War Department, The War of the Rebellion: a Compilation of the Official Records of the Union and Confederate Armies, US Government Printing Office, Washington, DC, 1880-1901, Series I Volume 23 Part I, p. 646. Hereinafter cited as OR.
Copyright © 2013 - All Rights Reserved - tebbsbend.org
Website by KTL Computer Concepts & OS Templates